This is a Monstera, and I’m going to share the top seven mistakes you may be making that are slowly killing your beautiful, sought-after, prized Monstera.
By the time you’re done, you’ll know exactly what you’re doing wrong and what to do to get your Monstera to thrive.
I’ll show you everything I do to care for my Monsteras. Every tip is crucial to your success.
1. Choosing the perfect Monstera for you
This could be the biggest mistake you make or already made. Starting with one that’s clean and healthy will help you avoid a bunch of drama, so make sure you don’t skip this step. If you already have a Monstera, it’s not too late.
I promise you the information here will help prevent you from killing your beautiful Monstera.
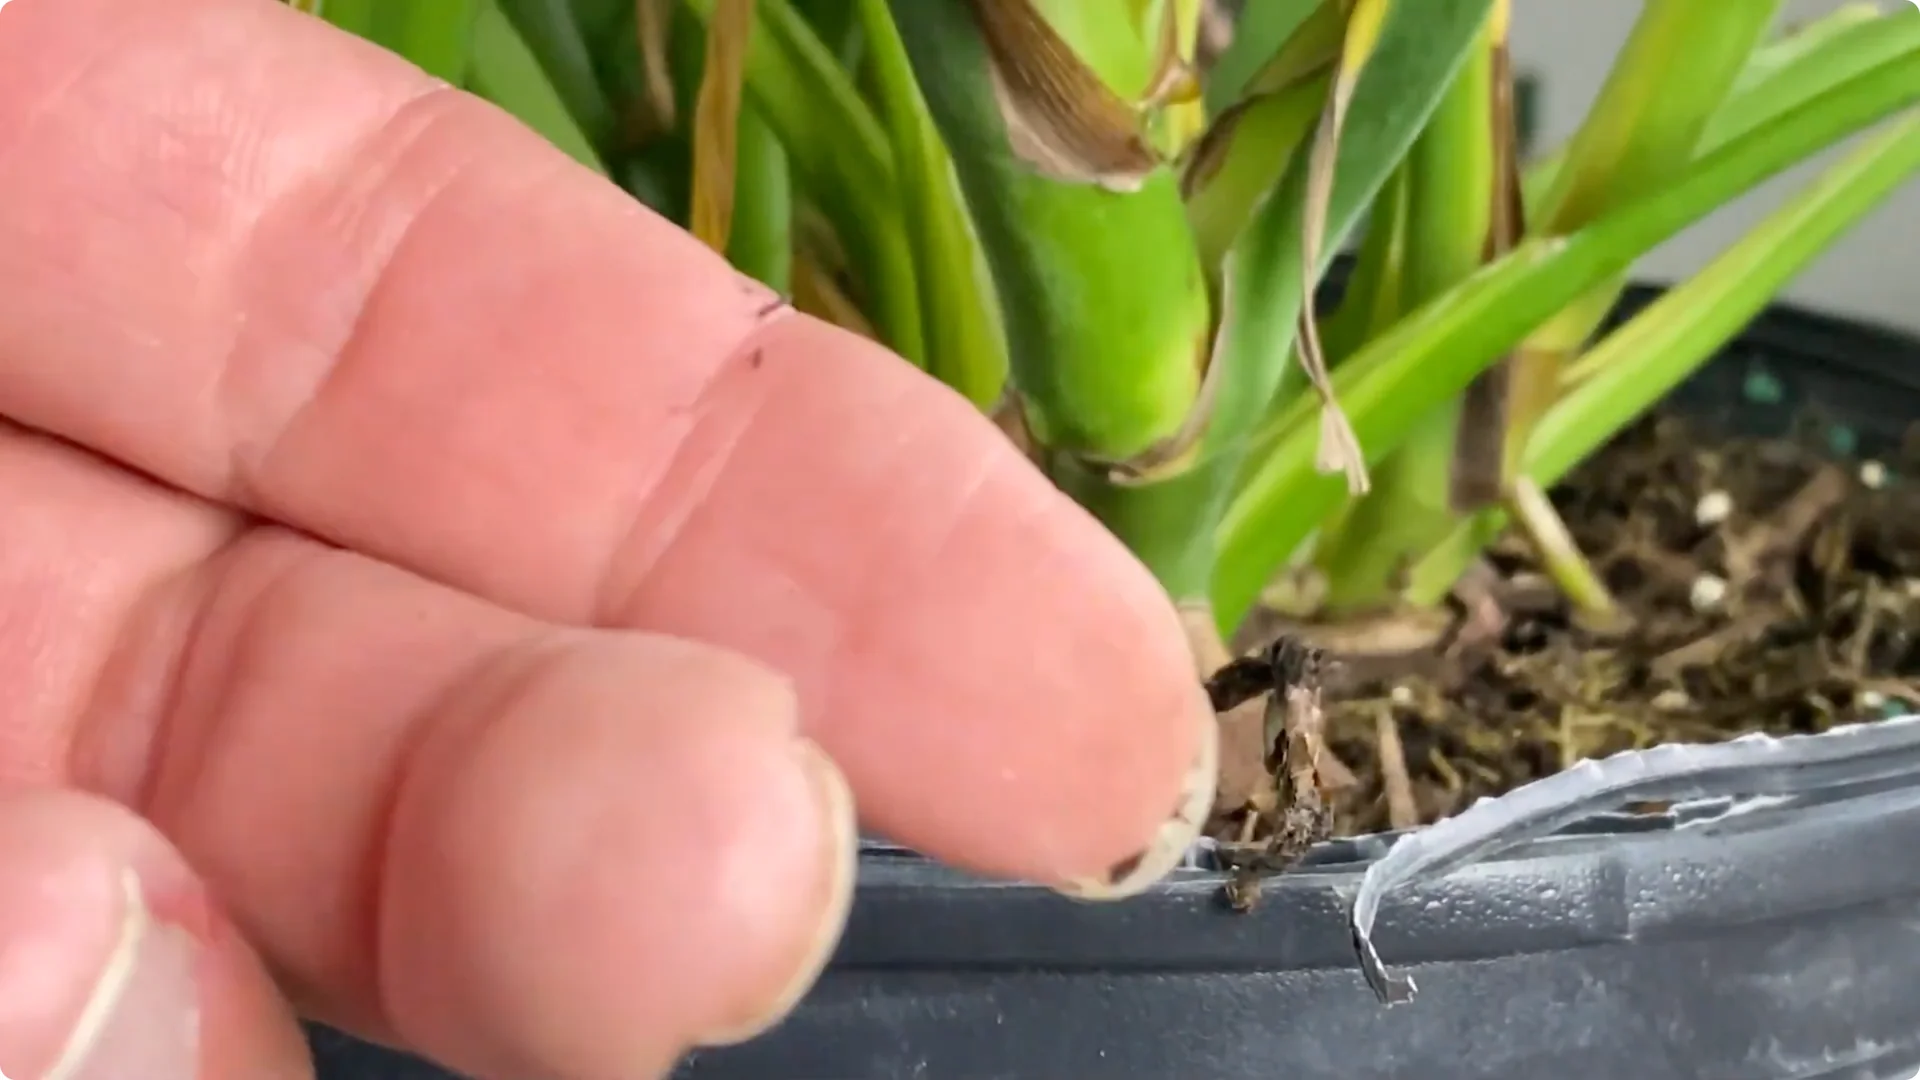
When you start looking for your Monstera, start by inspecting all around the plant. Look at the leaves on the top and the bottom, especially the bottom where pests like to hide. When looking all around, look for blemishes, which sometimes can be a sign of mechanical damage, but other times it can be disease.
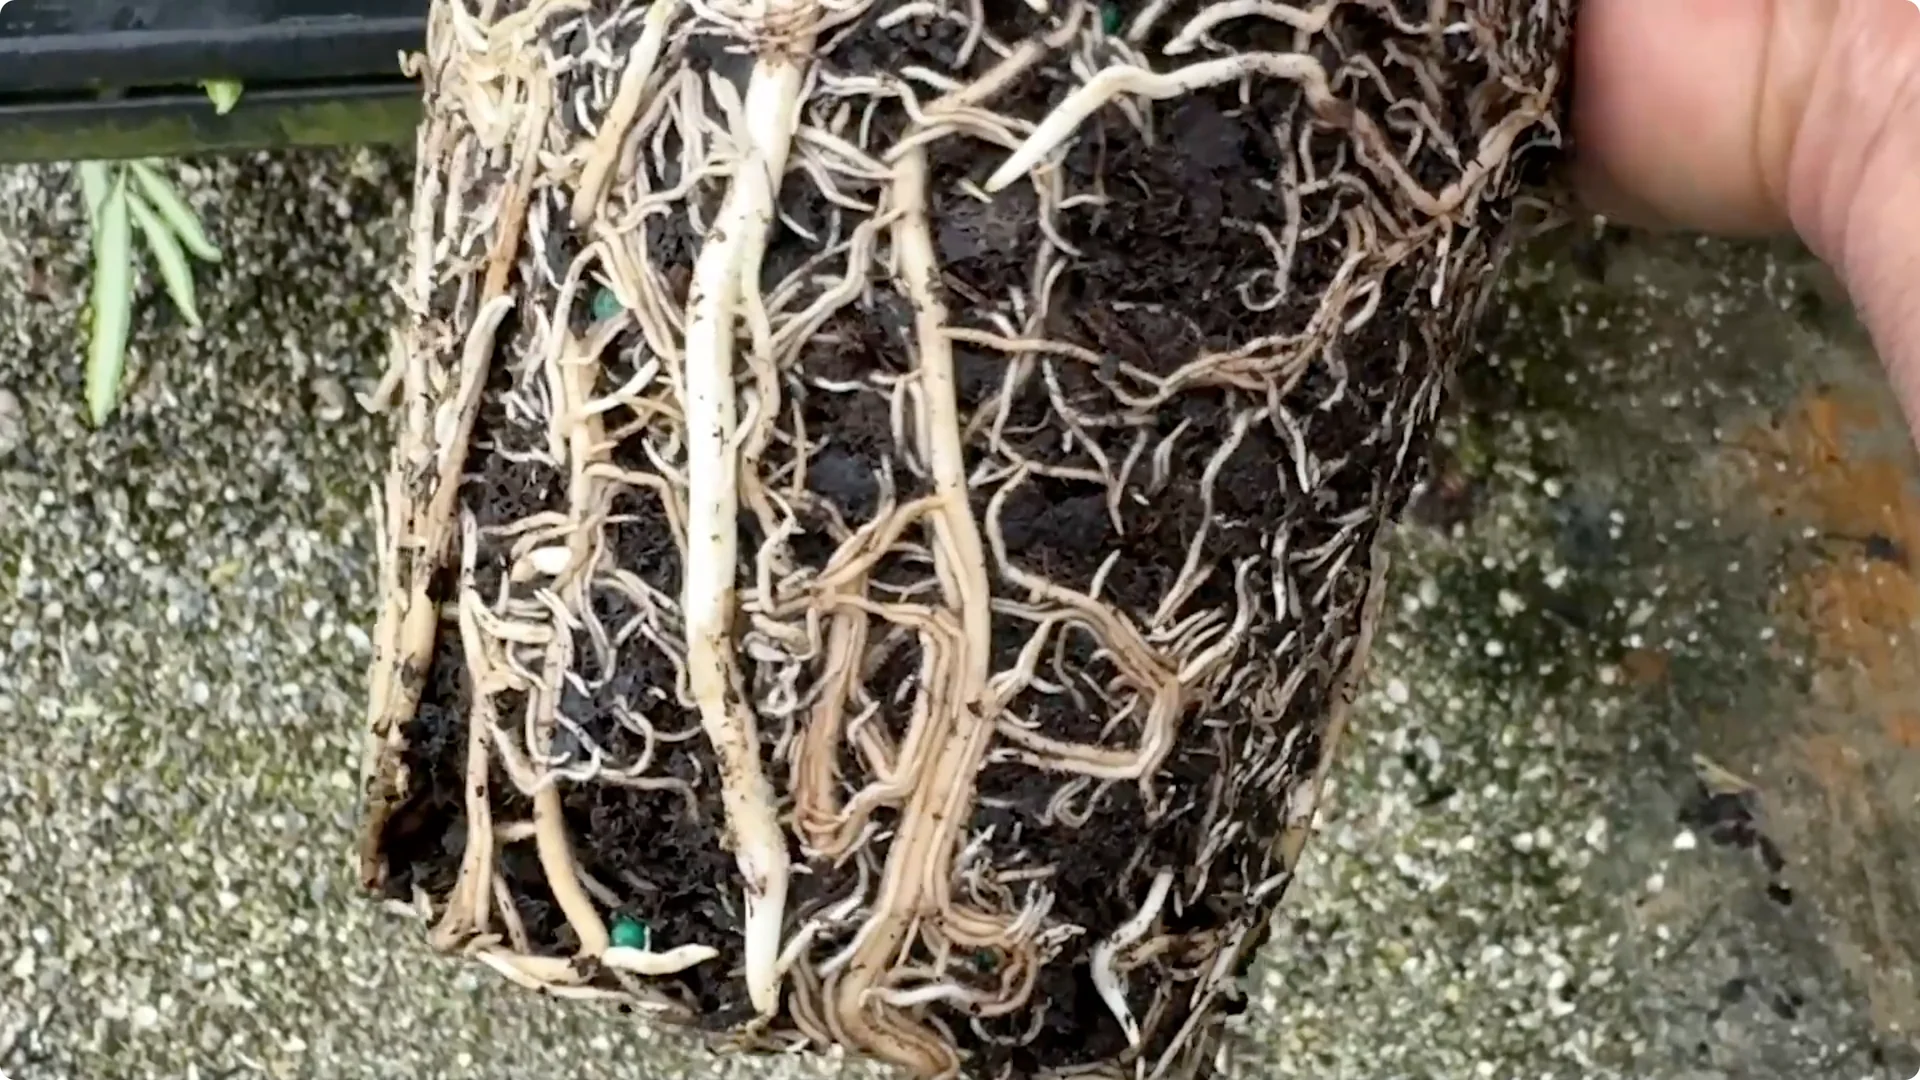
Also shake it around a bit and see if you see any fungus gnats flying out. I would stay away from all of these.
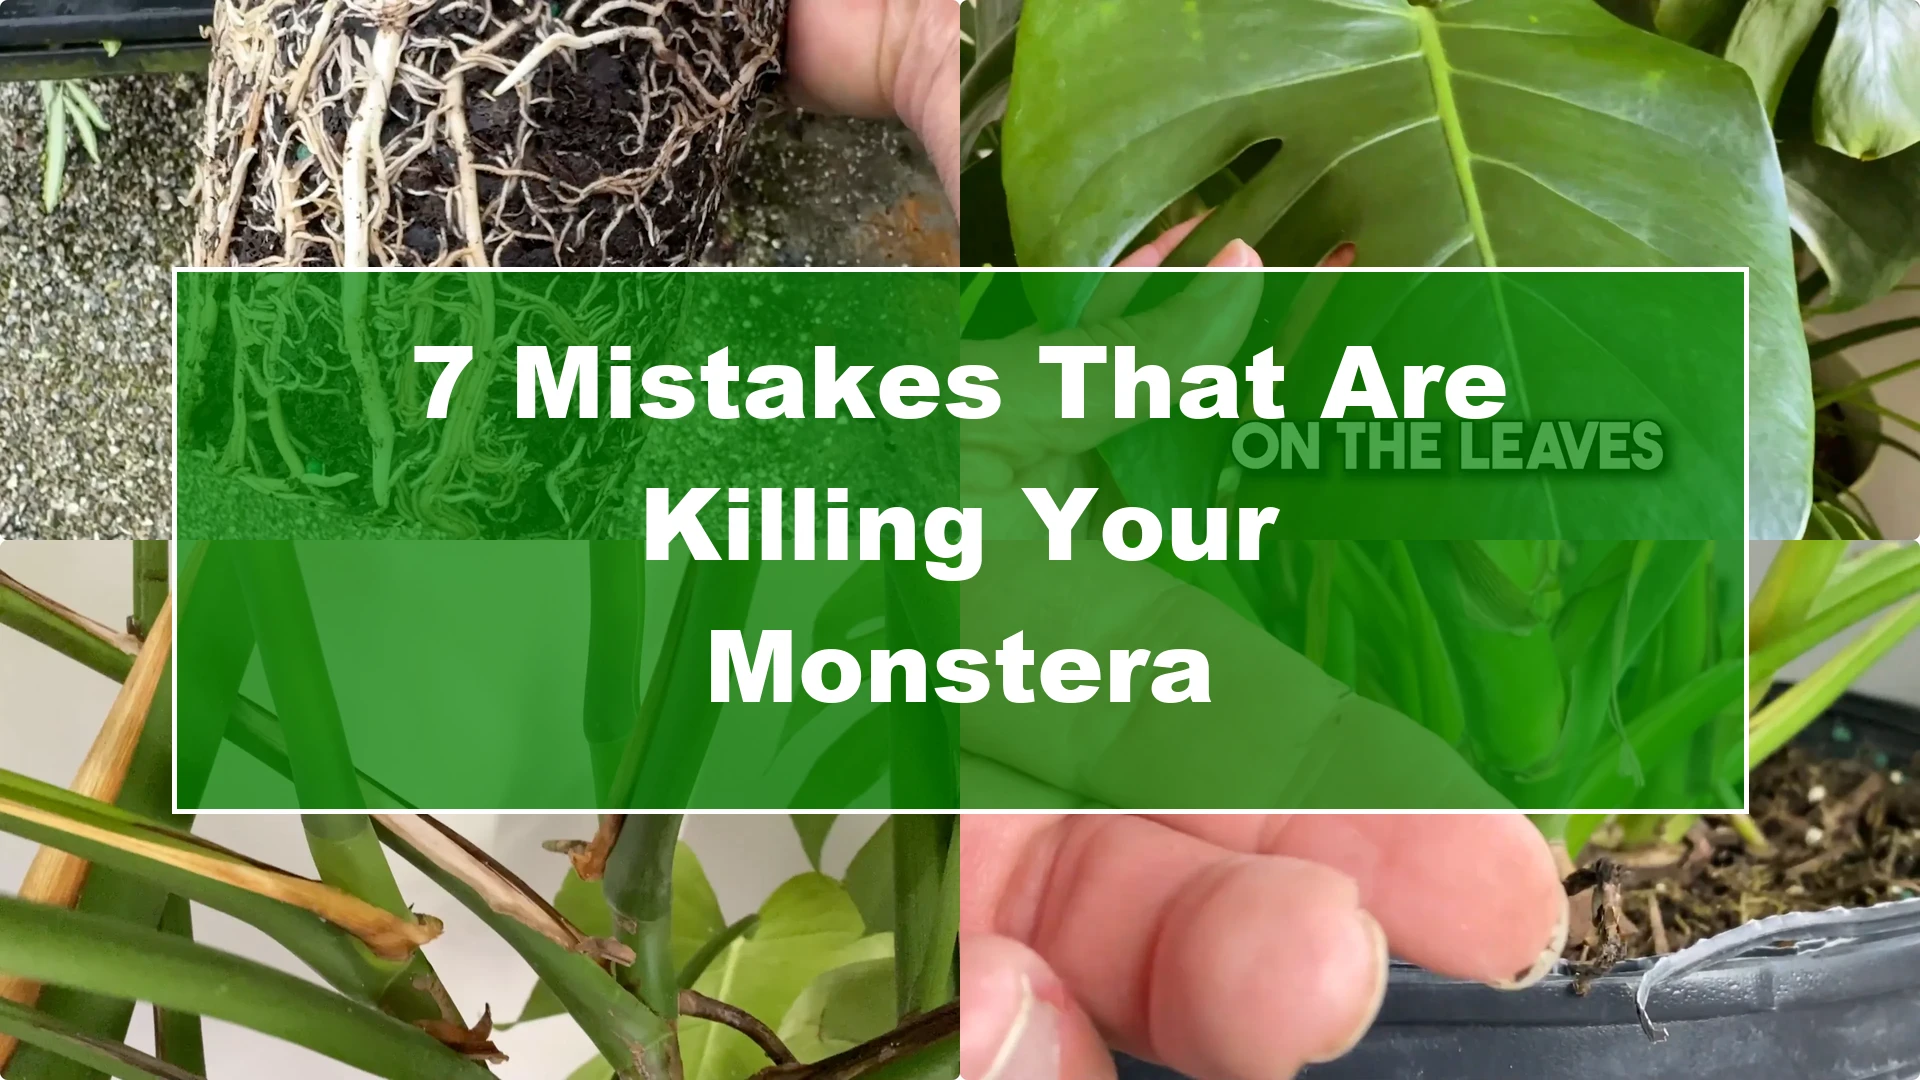
Go an extra step and remove the pot. Look at the roots. Make sure they’re pest-free and that they’re firm and not mushy, and that most of the roots are crispy white and not brown or black with a foul smell to them, which could be a sign of root rot.
Also look at the general appearance of the Monstera.
Are there at least two or three well established plants in the pot?
Most of the time when you buy them in a garden center they have a bunch of little plants in one pot, but we need to keep in mind that as the plant grows, if you want to create a specimen in the end, we may need to thin out the plant and stake it.
Put it in the perfect place that you thought about because you did your research before you even bought the Monstera.
2. Blasting your Monstera with direct sun too soon
Proper lighting is crucial for the health and growth of your Monstera, especially if you want those prized fenestrations – those are the holes in the leaves that everyone’s after. One common mistake that new Monstera owners make is exposing their Monstera to too much direct light too soon.
Native to the tropical rain forest of Central and South America, Monsteras thrive under the canopy of taller trees where they receive filtered indirect light.
If your plant is not acclimated correctly, then excessive direct sunlight can lead to leaf burn, evidenced by brown scorched patches on the leaves, yellowing, and drooping foliage.
To prevent this, place your Monstera in a spot with bright, indirect sunlight, using sheer curtains to diffuse any direct sunlight or positioning the plant a few feet away from the window. If you want to increase the intensity of the light it is receiving, do so by moving it closer to the light source little by little.
3. Parking it in insufficient light
Insufficient light can be just as bad for your Monstera. Even though Monsteras can tolerate low lighting conditions, they don’t thrive in them. Inadequate light slows down photosynthesis, stalling their growth and overall health.
Symptoms of insufficient light can include long internodal spacing or leggy growth, small underdeveloped leaves, and slowed or halted new growth.
If you’re deciding to keep yours in an area that does not have sufficient natural light, then I recommend you supplement with artificial grow lights.
4. Overwatering and poor drainage
Many of us think that we’re doing the right thing by keeping our Monstera watered constantly but don’t realize that overwatering is one of the most common mistakes that can harm a Monstera.
Monsteras are prone to root rot if their soil is wet for too long.
A couple of symptoms to look out for are yellowing leaves or mushy blackened roots. If you do suspect that you have root rot, take care of it and prevent it from happening in the first place.
To prevent overwatering, water your Monstera when the top 2 in of soil feels dry to the touch and ensure that the pot has drainage holes to allow excess water to escape. Also use a well-draining soil such as one containing peat moss, perlite, and orchid bark to help maintain the right moisture level without waterlogging the roots.
When your Monstera outgrows its existing pot and you decide that you need to step it up, always try to go to a pot that is 1 to 2 in larger than the existing pot.
This will reduce the probability of overwatering because if you go to a pot that’s a lot larger than the existing pot, then the existing root system compared to the amount of soil in the new pot won’t be enough to take up all of the excess water.
Do you always have to go up one to two sizes larger?
No. If you have some experience caring for plants and you do want to go a little bigger, you can, but keep in mind that you will have to manage the water that much more, and it would be best if you use a mix that has a little more drainage again to try to prevent root rot.
5. Misusing fertilizer and skipping leaching
Choosing the proper fertilizer and understanding when and how to use it is crucial for the health and growth of your Monstera.
Fertilizing should be done during the growing season, typically from Spring through Early Autumn when the plant is actively producing new leaves. During this time, feed your Monstera every 4 to 6 weeks with a balanced water soluble fertilizer diluted to half the recommended strength.
Always keep in mind that over fertilization can burn the roots, which damages the plant’s ability to absorb water and nutrients. Symptoms of overfeeding include brown crispy leaf edges and yellowing leaves.

To prevent this, always follow the dilution instructions for the fertilizer you’re using and avoid fertilizing during the plant’s dormant period in Winter.
Also be sure to leach your soil. Not leaching the soil can make the problem worse and lead to fertilizer buildup.
Leaching basically involves thoroughly watering the plant to flush out excess salts from the soil. This should be done every few months, especially if you notice signs of over fertilization.
To leach the soil, water your Monstera until water flows freely from the drainage holes, allowing it to drain completely, and repeat this process a few times in one session to make sure you get a thorough flush.
6. Neglecting regular health checks
Regular health checks are crucial. You probably think, I see my plant every day and I know how it’s doing – but you don’t unless you really get up close and personal with your Monstera.
Even the pros do this on a regular basis and it pays off for them, so why wouldn’t it for us?
Neglecting regular health checks on your Monstera can lead to a bunch of problems that might compromise the plant’s vitality and longevity. Regular health checks are especially important for catching issues early, giving us the chance to address them before they blow up into serious problems.
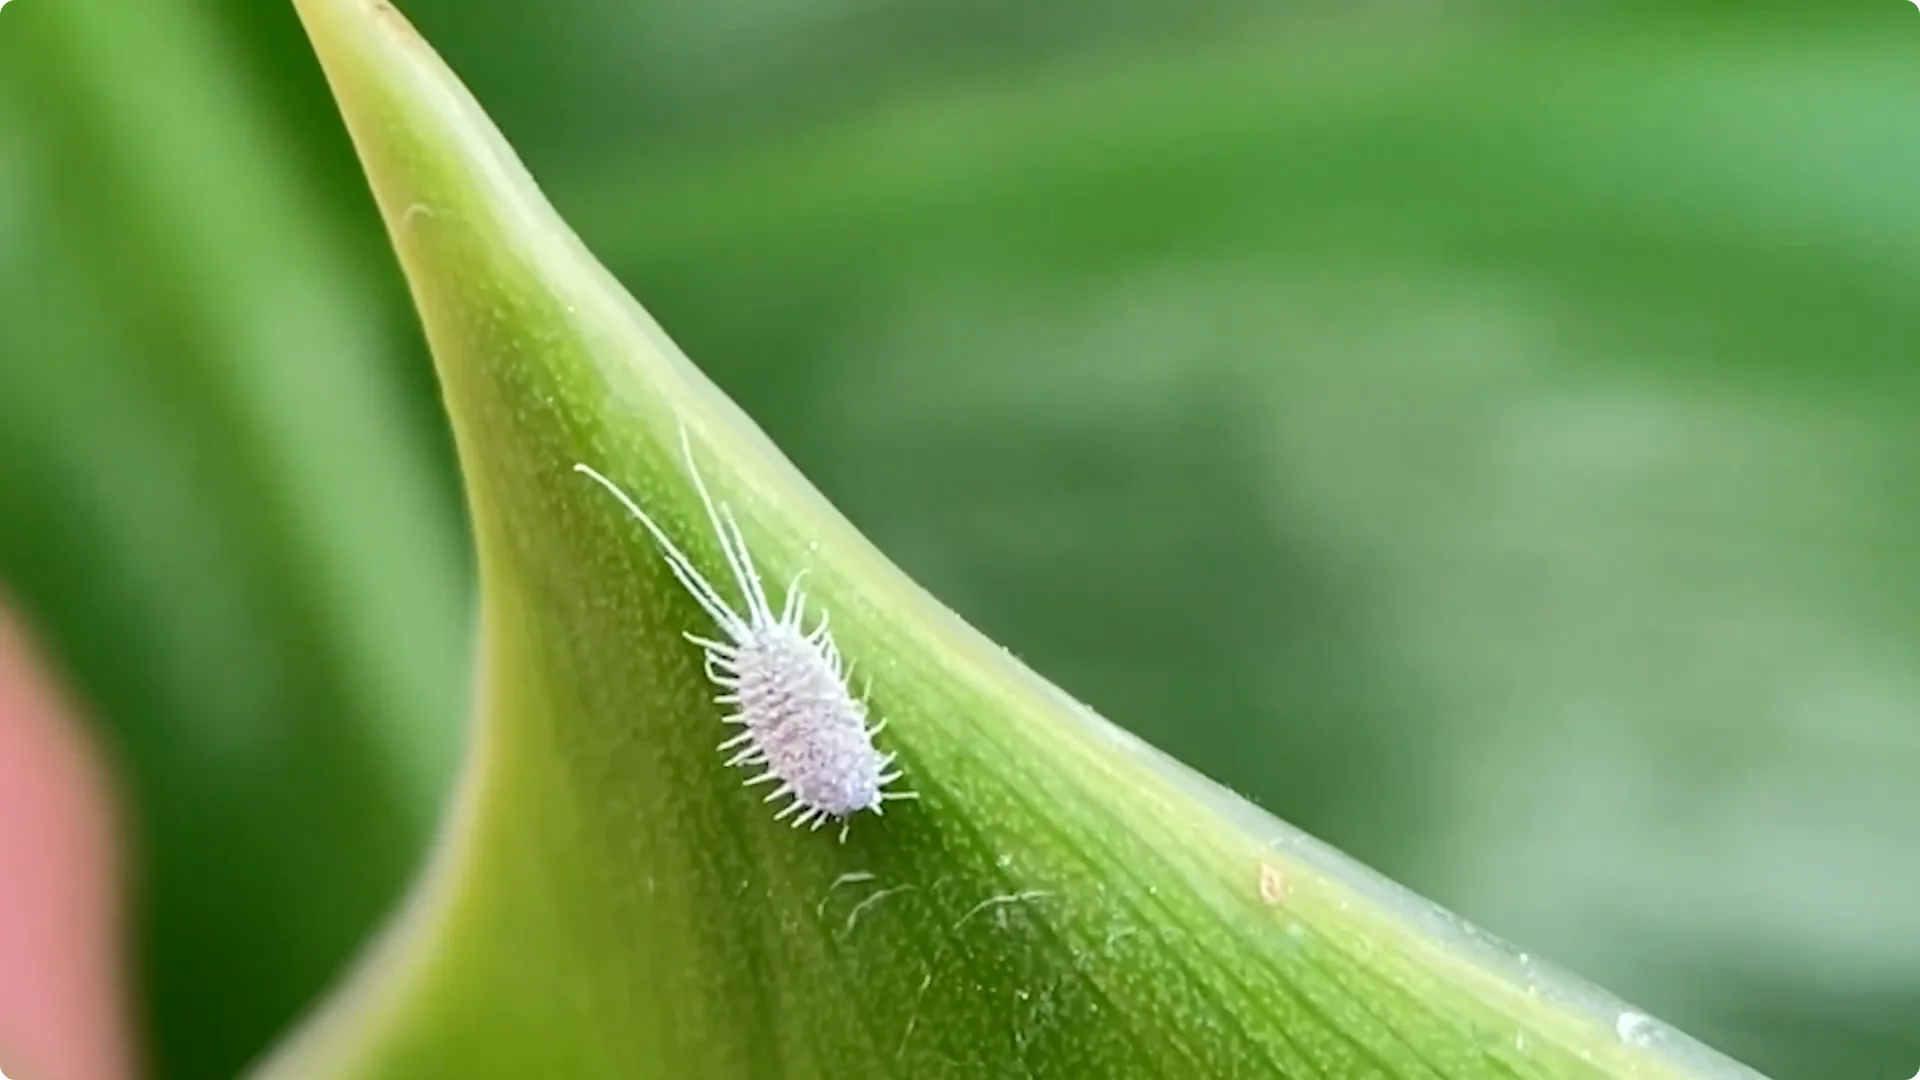
Without these checks, pests like spider mites, aphids, and mealybugs can go unnoticed and multiply, feeding on the plant and weakening it. Without regular checkups, signs of diseases such as root rot caused by overwatering or fungal infections can be overlooked.
Get in there like you did when you bought it. Check for disease, pests, possible nutritional deficiencies and toxicities, and catch any and all small problems before they become big problems.
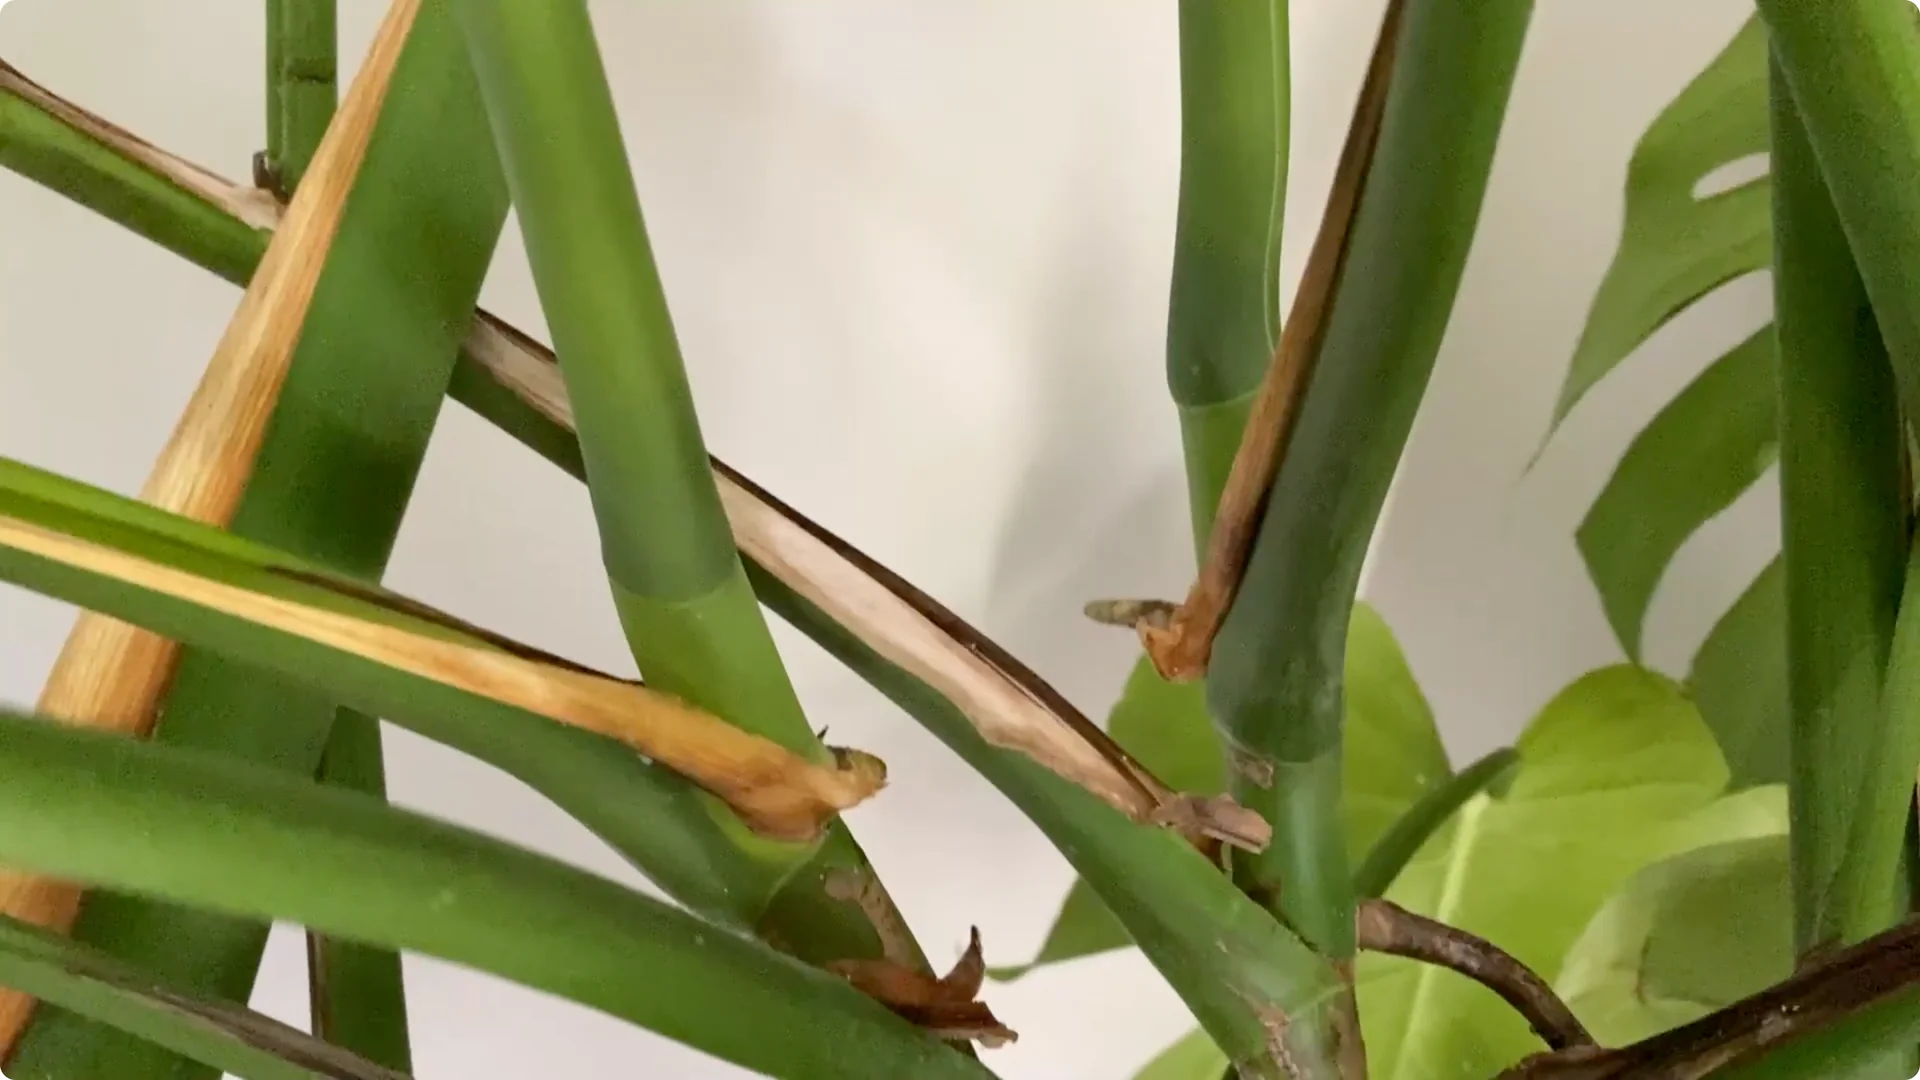
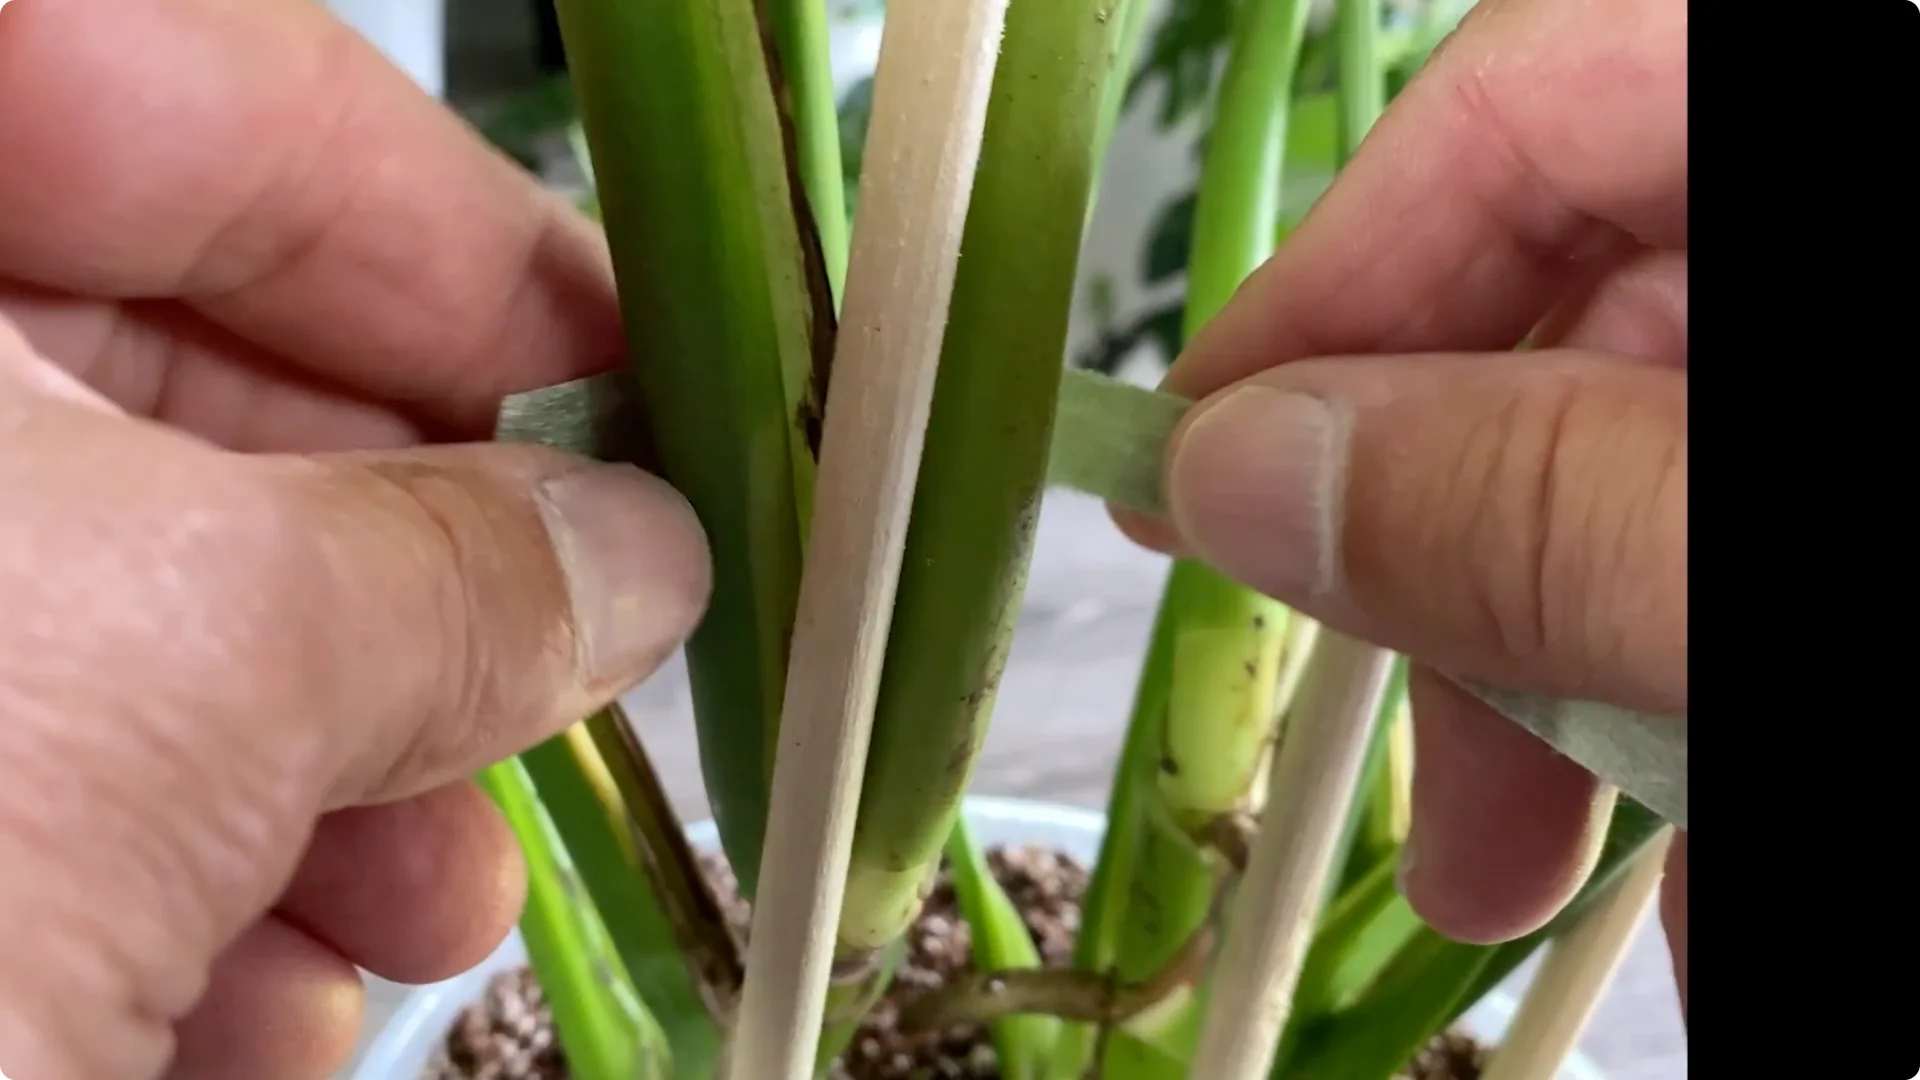
7. Skipping staking and structural support
We need to help it take off, and we do this by staking it, which is crucial for supporting its growth and promoting a healthy, aesthetically pleasing Monstera. In their natural habitat, Monsteras climb trees and other structures using their aerial roots for support.
Without proper staking, indoor Monsteras will grow every which way, with their large leaves and long stems going all over the place, which not only affects the plant’s appearance but can also lead to structural instability, increasing the risk of stems breaking under their own weight – and no one wants that, especially your Monstera.
To stake the Monstera, start by selecting a sturdy support such as a moss pole, a wooden plank – I prefer cedar – or, if it’s a smaller plant, bamboo will make for a great stake. Before inserting the stake, water the plant to ensure the soil is moist and soft, making it easier to insert the support without damaging the roots.
Place the stake into the pot, positioning it near the plant’s main stem but avoiding any other major roots, and make sure the stake is firmly anchored and stable.
Next, gently secure the Monstera to the stake using soft plant ties, twine, or velcro strips. Avoid tying too tightly to prevent damaging the stem.
Start at the base of the plant and work your way up, securing the plant every few inches to ensure it’s evenly supported.
As the Monstera grows, continue to tie new growth to the stake, adjusting the ties as needed to accommodate the plant’s expanding size. Preferably, you would need two to three plants per pot to start it right.
Final Thoughts
Keep these mistakes off your list and your Monstera will reward you with stronger growth, bigger leaves, and those beautiful fenestrations. Start with a healthy plant, give it the right light and water, feed and flush wisely, check it often, and support it as it climbs.